bernette 48 FUNLOCK

bernette 48 FUNLOCK
Artikelnr. 5240007124
€ 899,00
Beschikbaarheid online:
  • Op voorraad

bernette 48 FUNLOCK
Artikelnr. 5240007124

Productbeschrijving


Omschrijving

Jouw compacte combi-machine die in één beweging naait, snijdt en afwerkt, zodat elke naad rockt.

Functies

  • 2, 3, 4 en 5-draads naden
  • Brede overlocksteken: 3-7 mm
  • Brede coversteken: 2,8 / 5,6 mm
  • Brede combo-steken: tot 10 mm
  • Brede rolzoomsteken: 1,5 mm
null

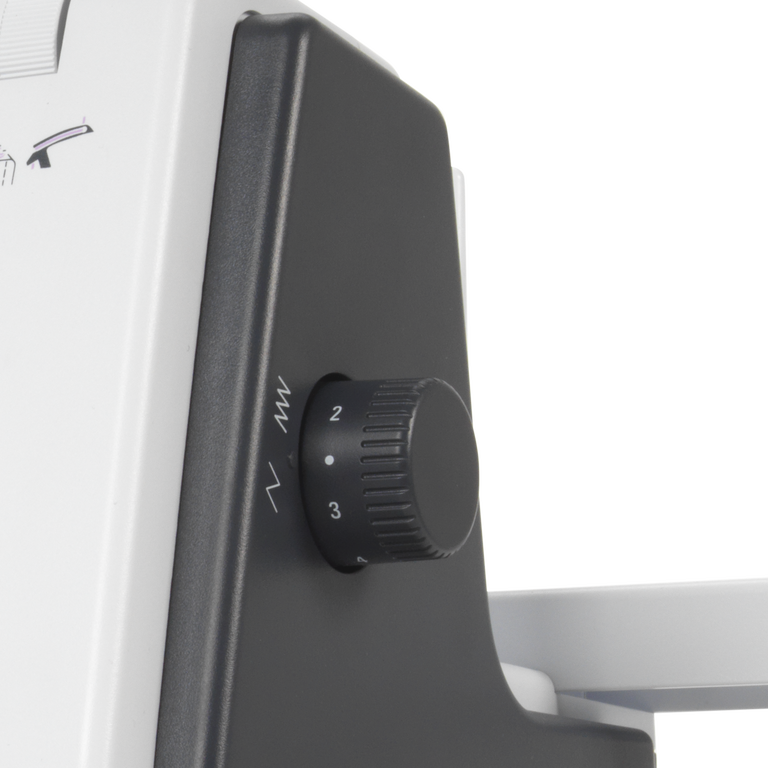
Een breed assortiment steken voor stevige, mooi afgewerkte naden


Met je bernette 48 FUNLOCK kun je uit allerlei steken kiezen: of je nu veiligheidsnaden moet maken of randen wilt overlocken, of je voor coversteken kiest, of de super-stretchsteken voor bijzonder elastisch materiaal, of je platte naden maakt, van rolnaden en rolzomen houdt of juist garenkettingen wilt maken – de mogelijkheden zijn met je bernette 48 FUNLOCK bijna eindeloos.

null

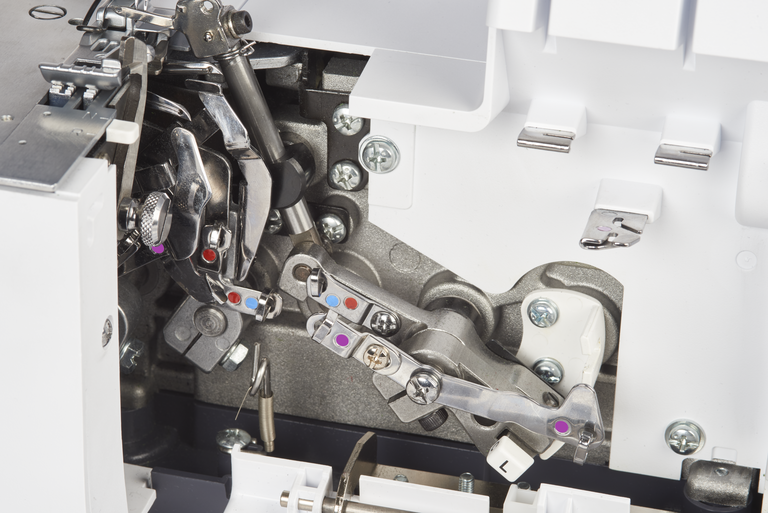
Inrijgen in een handomdraai


Als je de kleurgecodeerde inrijgpaden van de bernette 48 FUNLOCK volgt, is het inrijgen eigenlijk heel gemakkelijk. En de afzonderlijke naald- en grijperinrijger maken het inrijgen helemaal gemakkelijk.

null

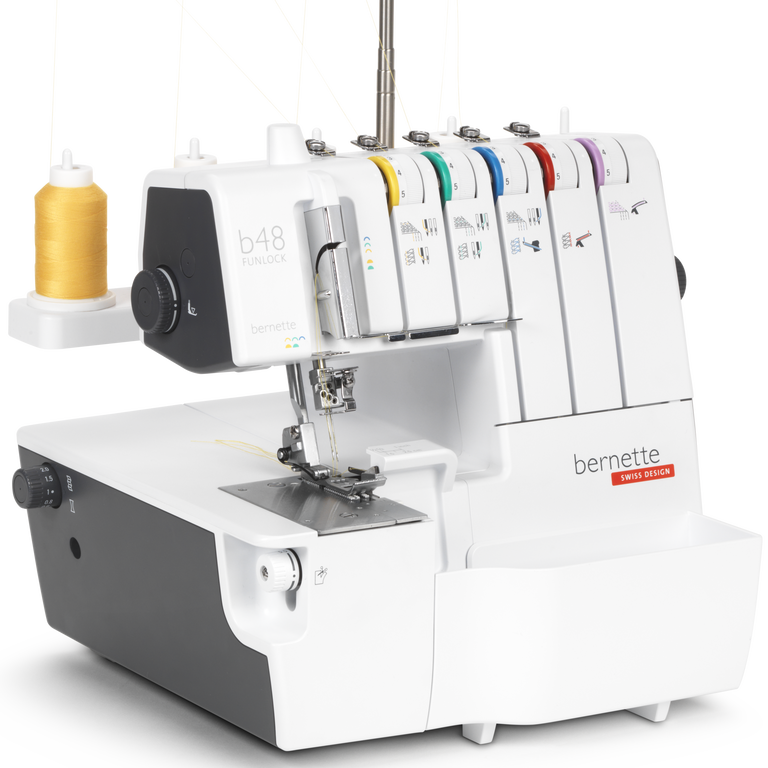
Groot werkvlak voor grote naaiprojecten


Met zijn werkvlak van 87 mm biedt de bernette 48 FUNLOCK voldoende ruimte voor grotere naaiprojecten. Een ander highlight is het heldere LED-licht, waardoor het gebied onder de naald altijd goed verlicht is.

null

Hoge naaisnelheid voor efficiënt werken


Met de bernette 48 FUNLOCK kunnen heel snel rechte lijnen worden genaaid. Met een naaisnelheid van wel 1300 steken per minuut en strakke, nauwkeurige steken, krijgt elk naaiproject snel vorm en is in een mum van tijd klaar.


Features and Functions

Elektronisch pedaal
Afmetingen van de machine L / B / H [mm]
360 300 290
Gewicht van de machine [kg]
7,800 g
Lengte van vrije arm rechts van de naald [inch / mm]
87 mm
Hoogte werkruimte [inch / mm]
60 mm
Spoelhouder [nummer]
5
Hoofdmotor, Type
AC
Maximale naaisnelheid [spm]
1,300 spm
Stofborstel
Naaldenassortiment
Net voor bovengarenklossen
Stofkap machine
Accessoirebox

Tutorials

b48 + b44 + b42 Tutorial – Preparation (1/15)
Further information is available at http://www.mybernette.com Do you want to start using your b48, b44 or b42 for the first time? In our video tutorial, we show you the first steps. How do you attach and align the thread stand and the thread guide holder correctly? How do you connect the mains cable and the foot control, and where is the looper cover, as well as the accessories stored inside it? This basic information will help you get to know your overlocker and prepare for your first sewing project!
b48 + b44 + b42 Tutorial – Preparation (1/15)
b48 + b44 + b42 Tutorial – Rethreading (2/15)
Further information is available at http://www.mybernette.com In this video tutorial for your b48, b44 or b42, you will learn important basic information about rethreading, such as: when do you use the spool stabilizers? How can you tie directly onto threads for easy rethreading? How do you separate the thread chain, how do you pull the needle threads through first and then the separate looper threads?
b48 + b44 + b42 Tutorial – Rethreading (2/15)
b48 + b44 Tutorial – Overlock threading (3/15)
b48 + b42 Tutorial – Coverstitch/chainstitch (10/15)
b48 + b44 Tutorial – Thread tension and overlock stitch optimization (5/15)
Further information is available at http://www.mybernette.com The appearance of the overlock stitches on your b48 or b44 is influenced by the type of fabric, the thread, the needles, stitch length and differential feed. To allow the threads to interlock loosely, first loosen one thread tension before you tighten another. In this video tutorial, we show you how to control and optimize the thread tension for the various types of overlock stitches. We show you what details you should consider for the following stitches: 4- and 3-thread overlock and 3-thread narrow seams, 3-thread roll hems, and 3-thread flatlock stitches.
b48 + b44 Tutorial – Thread tension and overlock stitch optimization (5/15)
b48 + b44 + b42 Tutorial – Stitch length and differential feed (7/15)
b48 + b44 Tutorial – Stitch width, cutting width, rolled hem (8/15)
b48 + b44 Tutorial – Upper looper converter (9/15)
b48 + b44 Tutorial – Basic overlock settings and sewing test (4/15)
Further information is available at http://www.mybernette.com With the help of this video, you can try out your first overlock stitch sewing test on your bernette 48 or bernette 44. What basic settings do you need to sew your first stitches? What do the thread tension, stitch length and differential feed do? How do you set the knife to the correct position, and how do you use the roll hem lever and presser foot pressure? When you have laid all the threads from the looper eye and the needle eye under the presser foot, lower the foot and you can slowly start to sew. The excess seam allowance is automatically cut off during the process.
b48 + b44 Tutorial – Basic overlock settings and sewing test (4/15)
b48 + b44 + b42 Tutorial – Changing the needles and needle threader (6/15)
Further information is available at http://www.mybernette.com This video tutorial shows you how to change the needles on your b48, b44 or b42, and how to use the needle threader. When you open the looper cover, you will find a needle holder and an appropriate screwdriver. To change a needle, first loosen the needle screw slightly. When you then wiggle the needle slightly, it will come out. Now insert the new needle into the needle clamp and push it all the way up into the correct position. You can then tighten the needle screw again. The video continues showing the use of the needle threader, which you orient with the notch up. You can then insert the thread horizontally and guide it along the needle groove with little pressure until the thread is guided through the needle eye. Now you can pull the thread through the eye of the needle with ease.
b48 + b44 + b42 Tutorial – Changing the needles and needle threader (6/15)
b48 + b42 Tutorial – Coverstitch/chainstitch: basic settings and sewing test (11/15)
Further information is available at http://www.mybernette.com Would you like to carry out your first sewing test using coverstitch or chainstitch on your b48 or b42? Coverstitch is ideal for sewing hems, for example on elastic materials. In this video tutorial, we take you through the process, from the basic settings to sewing for the first time. First, we check the thread tensions, the stitch length setting, the differential feed setting and the presser foot pressure. Then we cut back the looper thread and make sure that the needle threads are not twisted. Now we start sewing, using the markings on the cover as guidelines. The first stitches are secured by the subsequent stitches, it is up to you to secure the last stitches manually.
b48 + b42 Tutorial – Coverstitch/chainstitch: basic settings and sewing test (11/15)
b48 + b42 Tutorial – Stitch optimisation for coverstitch and chainstitch (12/15)
b48 Tutorial – Converting from overlock to coverstitch/chainstitch (13/15)
b48 Tutorial – Basics of combo stitches (14/15)
b48 + b44 + b42 Tutorial – Maintenance (15/15)
Further information is available at http://www.mybernette.com It is important to take a little time to regularly clean and maintain your b48, b44 or b42, because during sewing and cutting, fabric, thread and, of course, dust residues build up. In this video tutorial, we show you how to care for your bernette properly. When you open the looper cover, you will find a brush. In the accessory box you will also find a screwdriver and the overlock machine oil. The video shows you exactly how to remove the presser foot and the stitch plate to clean your machine in this area. We then show you which parts you can oil and what to do to make sure the oil is well distributed.
b48 + b44 + b42 Tutorial – Maintenance (15/15)